‘Lots of pictures’: how to 3D model a complex structure
When Pölkky Oy, a company specializing in wood processing and lumber milling in Finland, needed to replace an essential piece of equipment, real estate manager Jaakko Laihola was asked to model the site and the machine.
Laihola, a hobby photographer turned photogrammetrist describes it as the most complicated model created in his career to date - but also the easiest.
Project details
| Company | Pölkky Oy |
| Location | Kuusamo, Finland |
| Date | August 2018 |
| Project length | 1 week |
| Images captured | 755 aerial pictures 646 terrestrial pictures |
| Hardware | DJI Phantom 4 Pro for aerial shots Canon EOS 6D + EF 17-40 f4.0 for terrestrial photos |
| Software | Pix4Dmapper photogrammetry software |
| GSD | 0.5 cm |
Another use for Pix4D
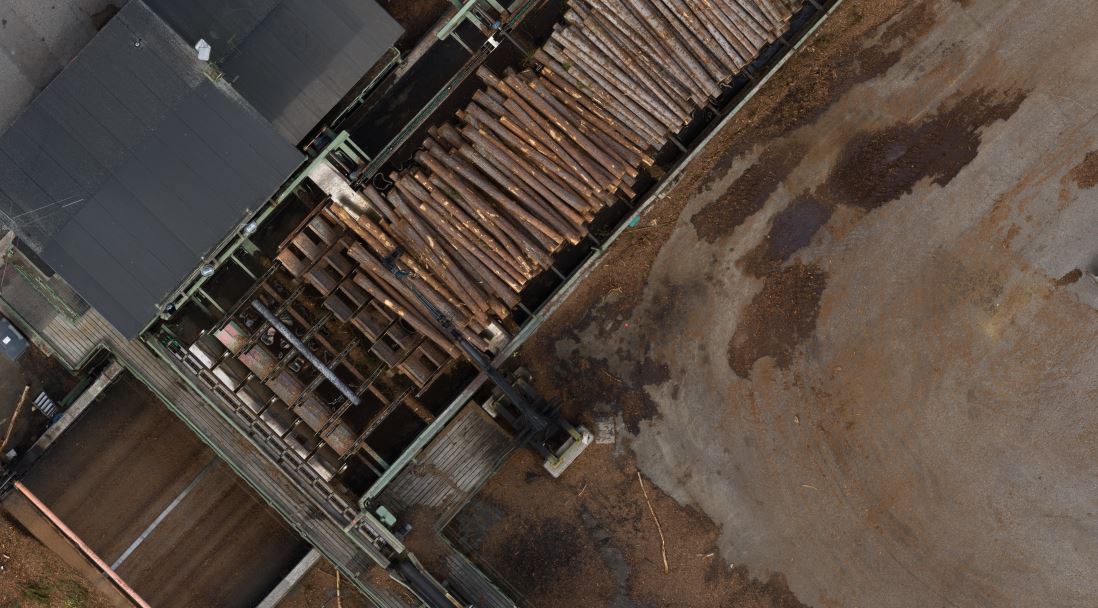
Pölkky Oy uses Pix4Dmapper photogrammetry software in their day-to-day work to measure the volume of piles of woodchips, sawdust, and other refuse.
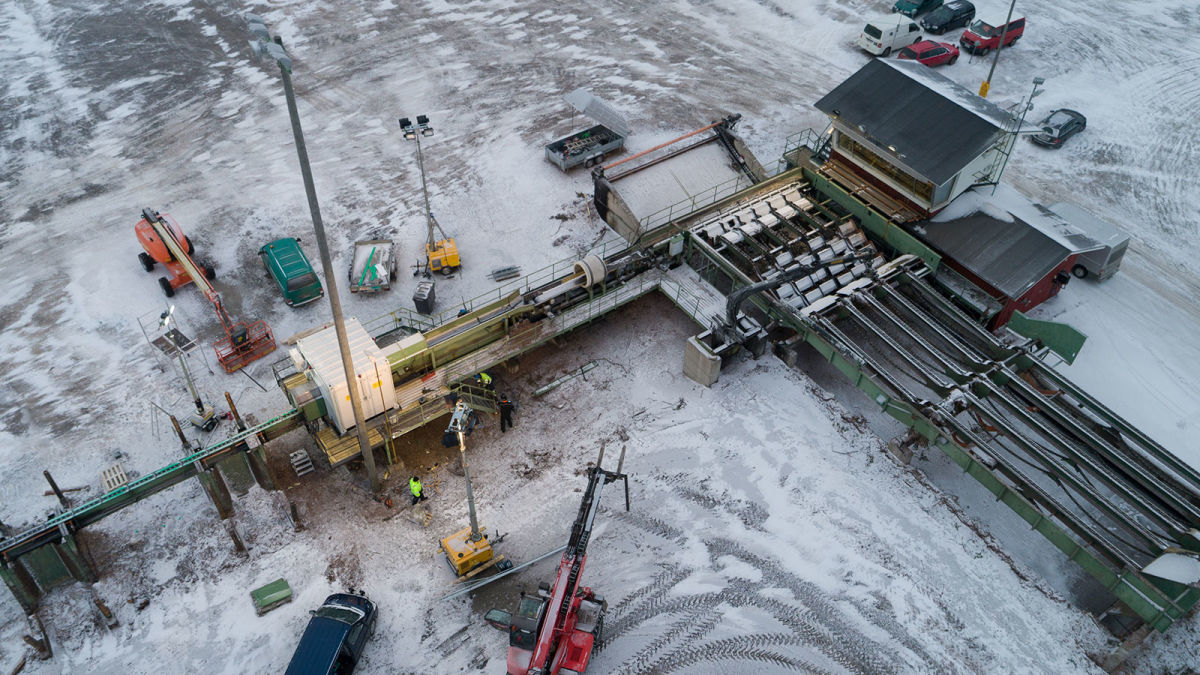
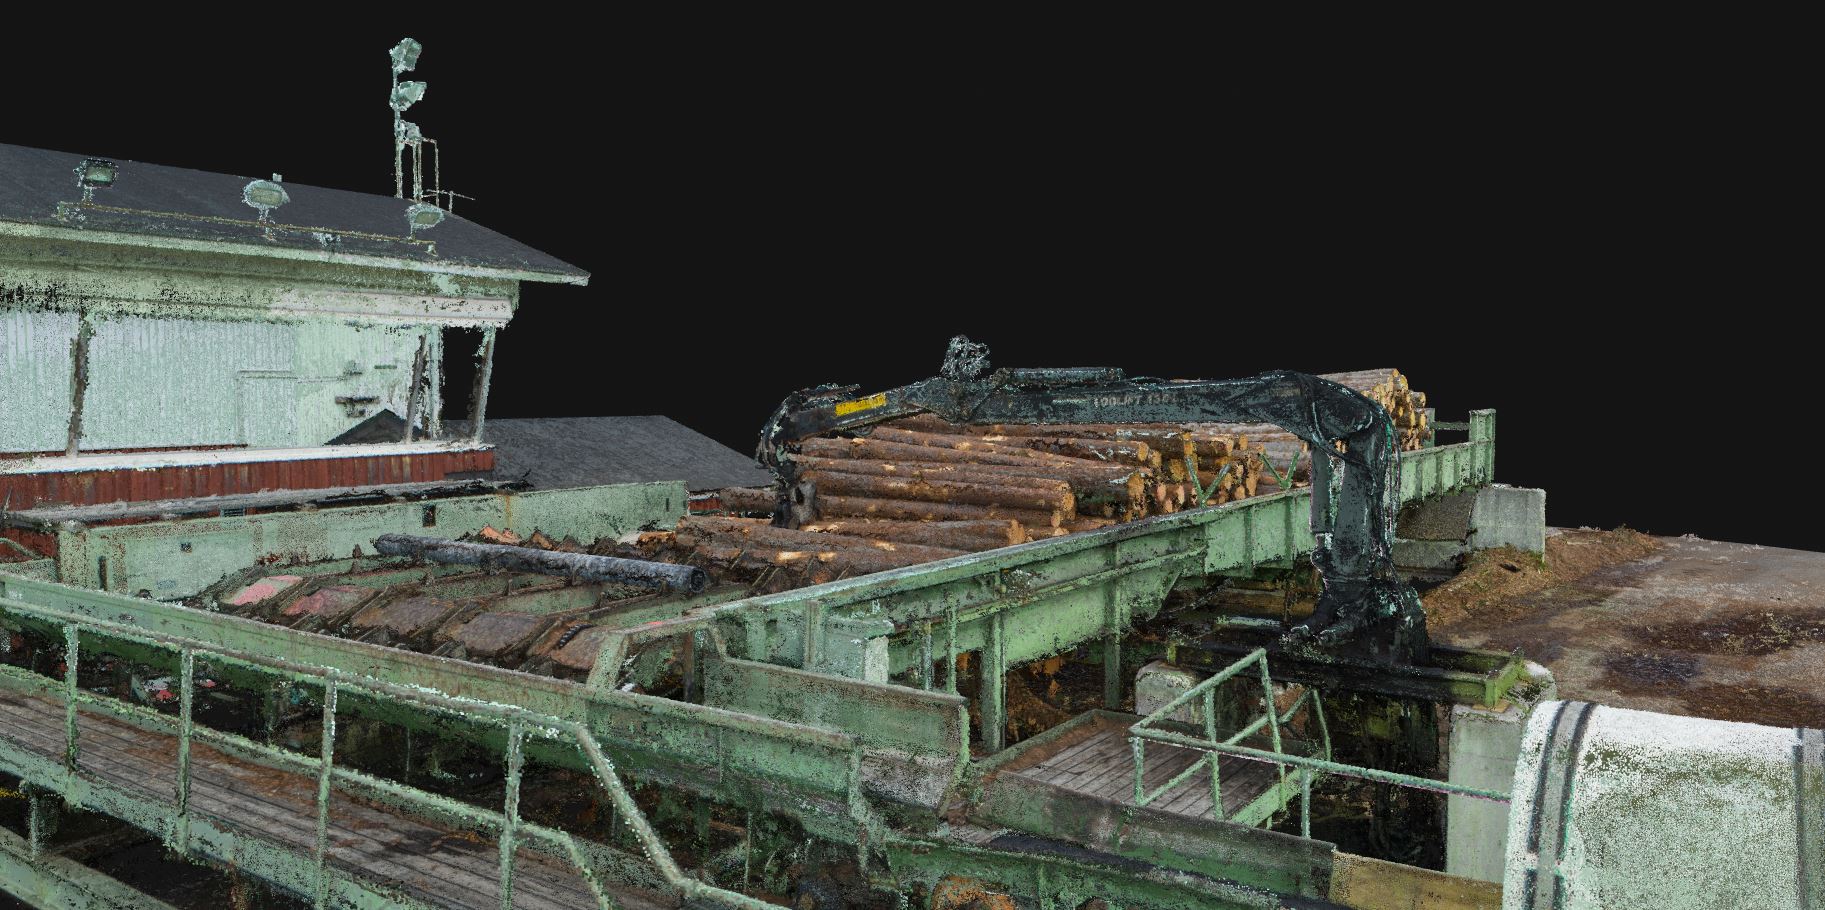
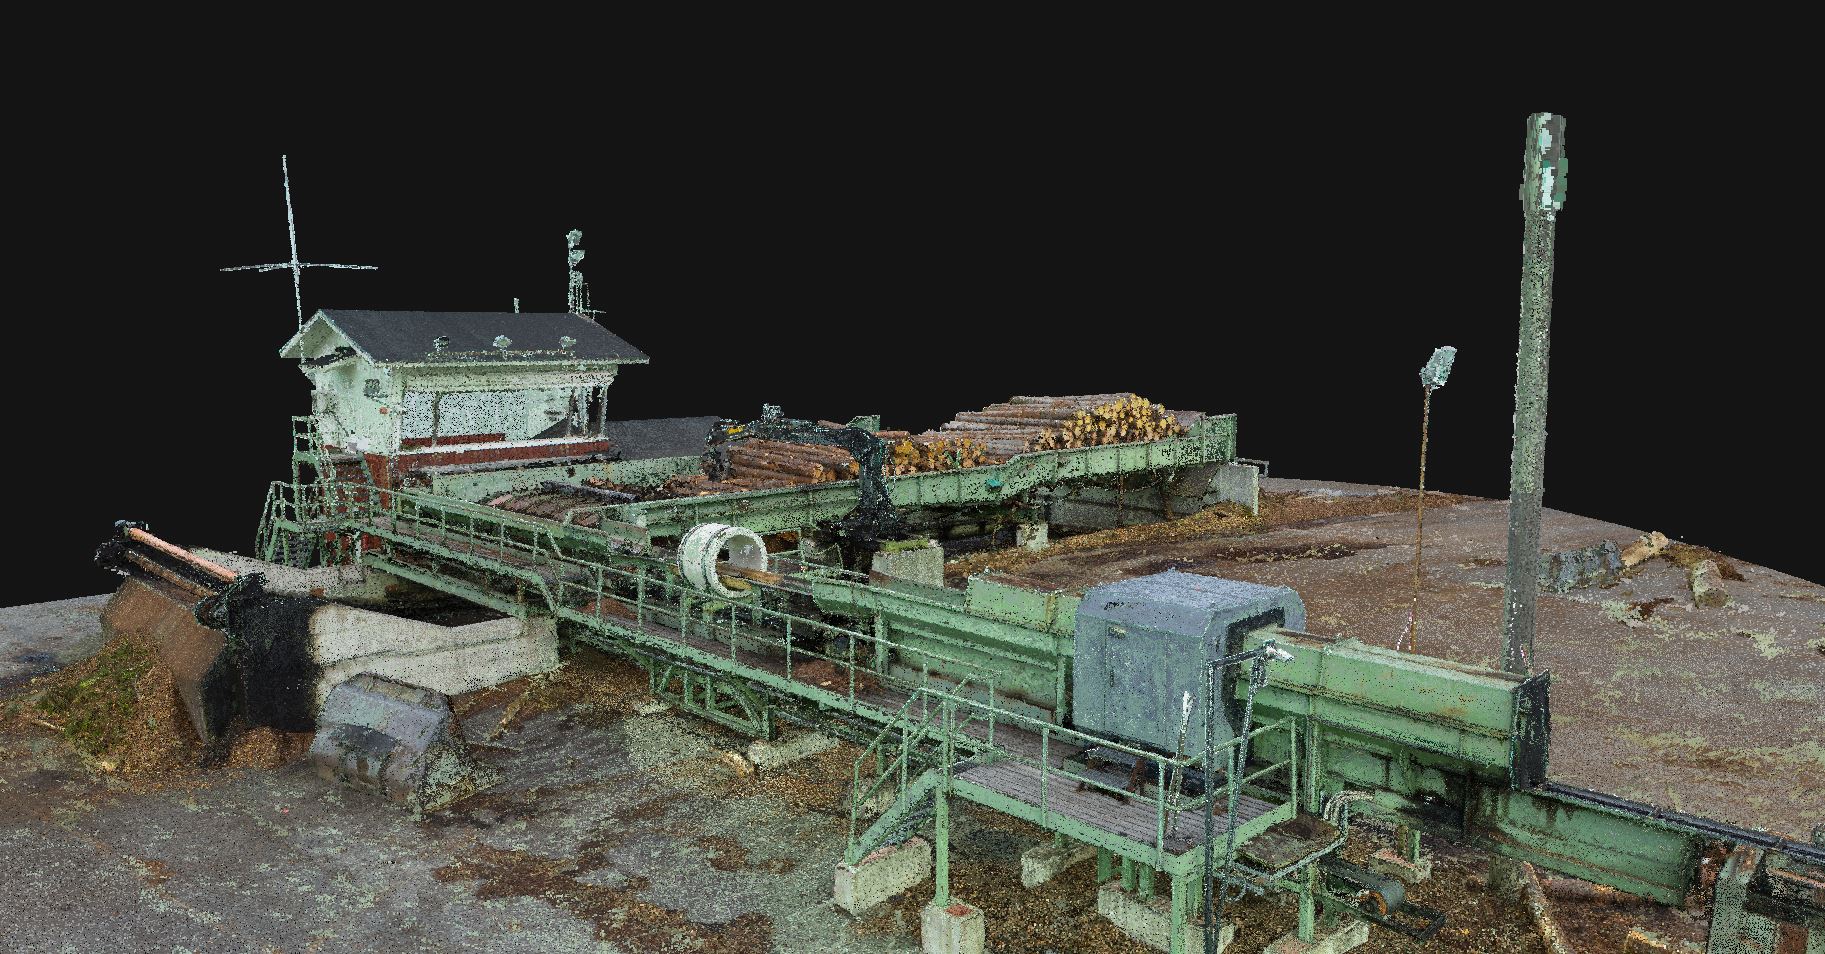
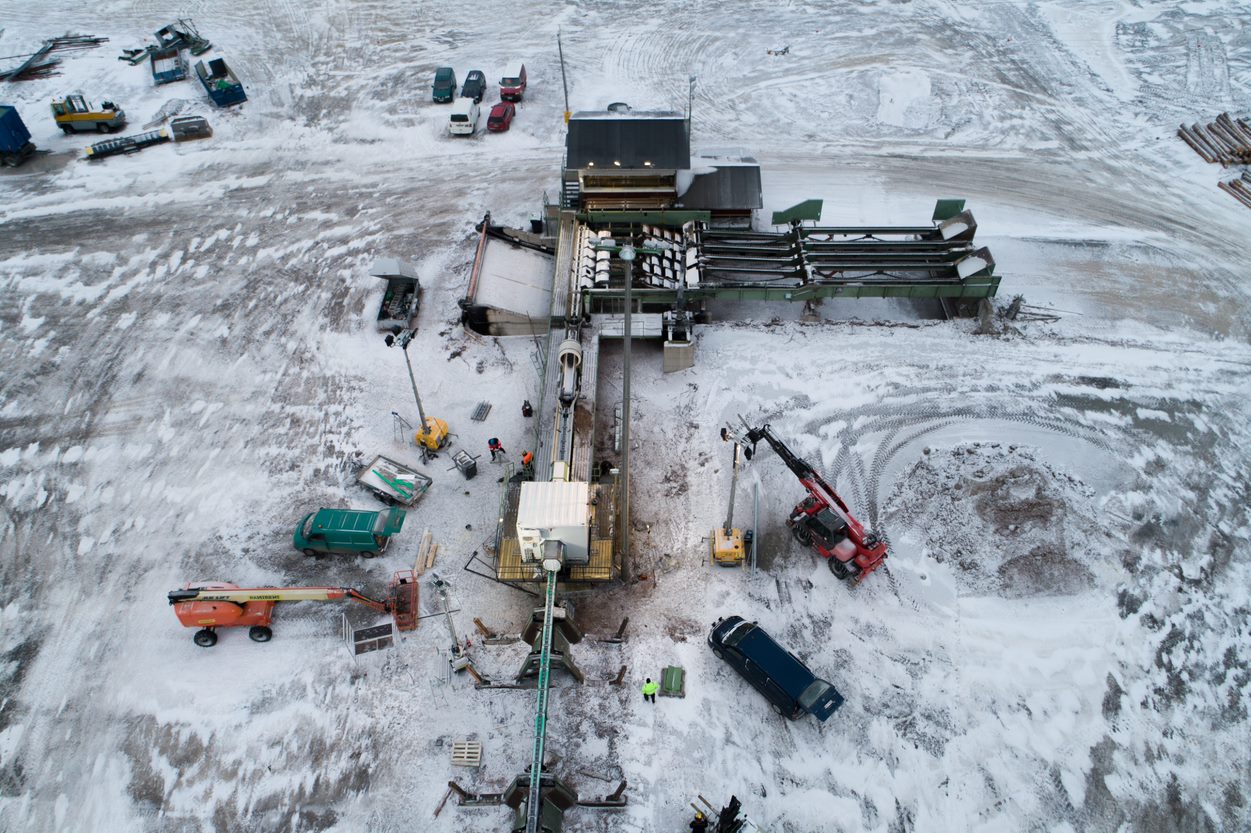
However, mapping infrastructure is a new process for the company. The log measuring machine is a vital piece of equipment, as it scans tree trunks for imperfections to achieve more efficient milling. It was due for an upgrade, but the bulky machine - measuring about 2.5 x 2.5 meters - first had to be removed, and new foundations laid as the upgraded x-ray machine needed a new base isolated from the vibrations caused by the log conveyor.
Laihola describes the project as “The most complicated project I’ve done so far. It’s a complicated structure, with cranes and chains and everything. I took a lot of pictures to make sure I got it done correctly the first time.”
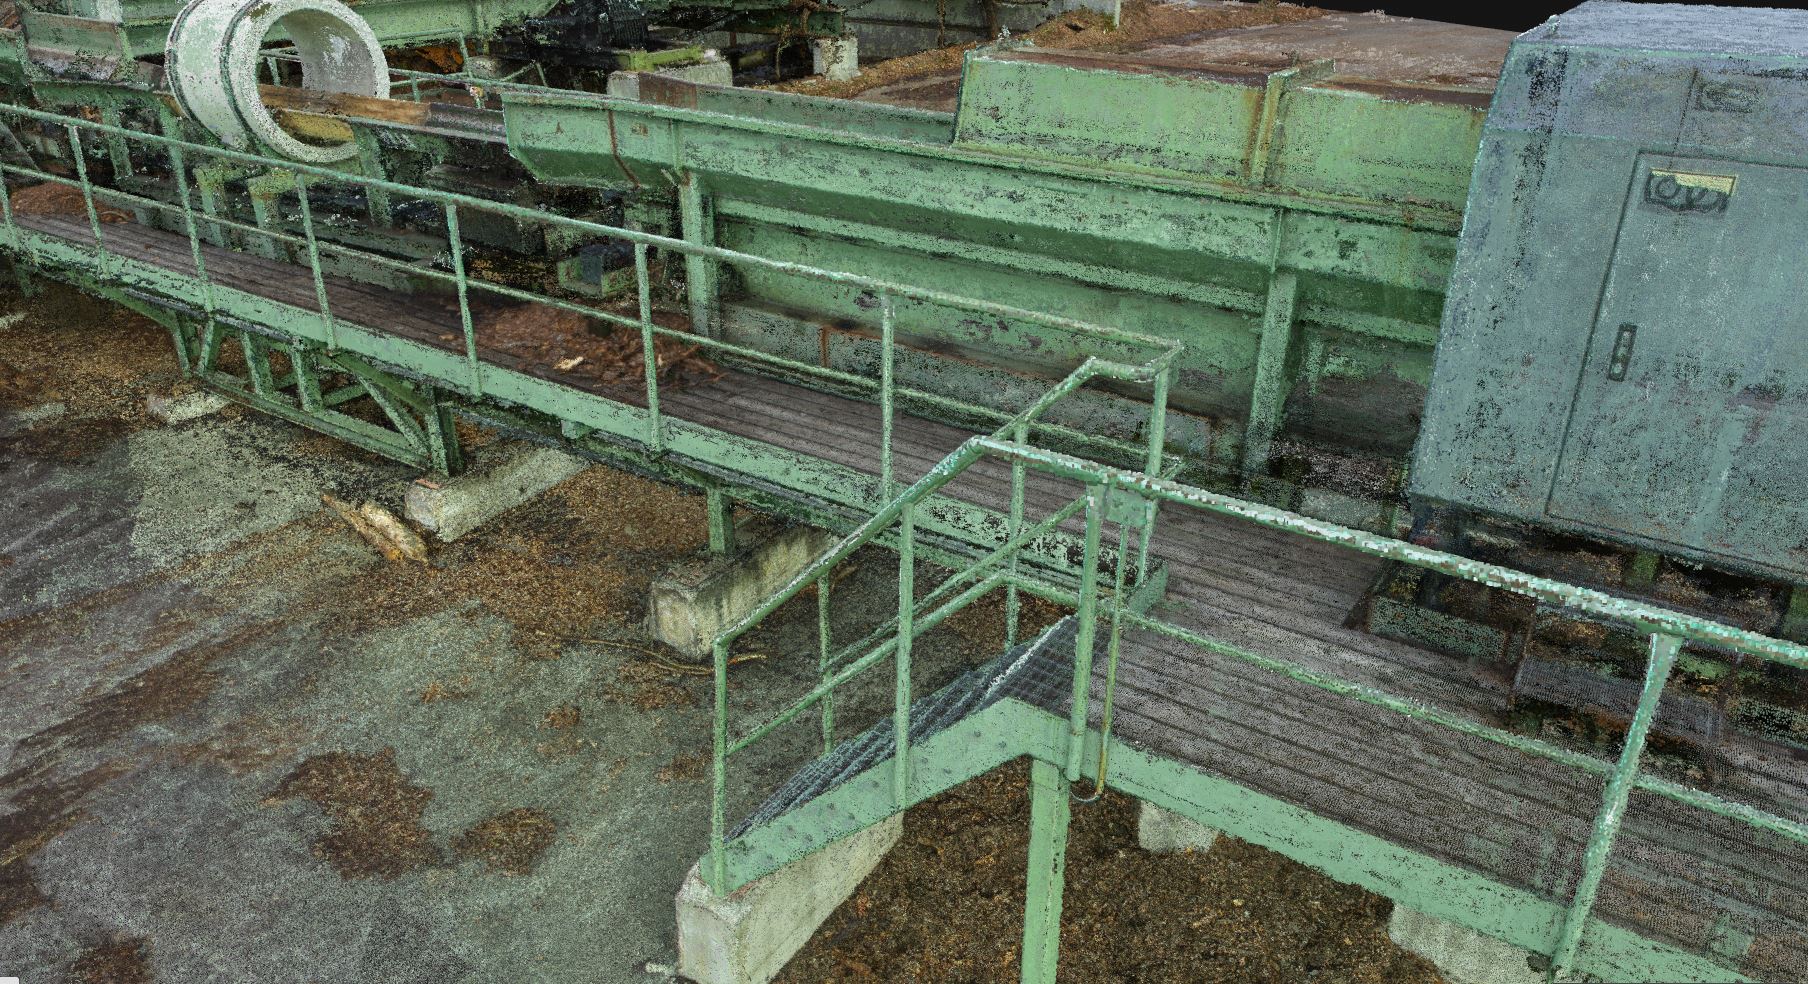
The resulting model clearly shows the details of the machinery, including thin railings which are difficult to model using photogrammetry - demonstrating Laihola's skill with the software and dedication to the project. "It took some time, but it wasn't difficult!" says Laihola.
Getting the shot
To model the complex structure, rich with texture and depth, Laihola relied on taking a lot of photos.
Both terrestrial and aerial images were shot in a single day. Terrestrial images were shot at with a Canon EOS 6D DSLR with an EF 17-40 f4.0 lens at 17mm f8.0. The wide field of view of this lens captured more information in each shot, helping to ensure sufficient overlap. Laihola used a monopod to stabilize each shot - but adds a tripod would have been even better.

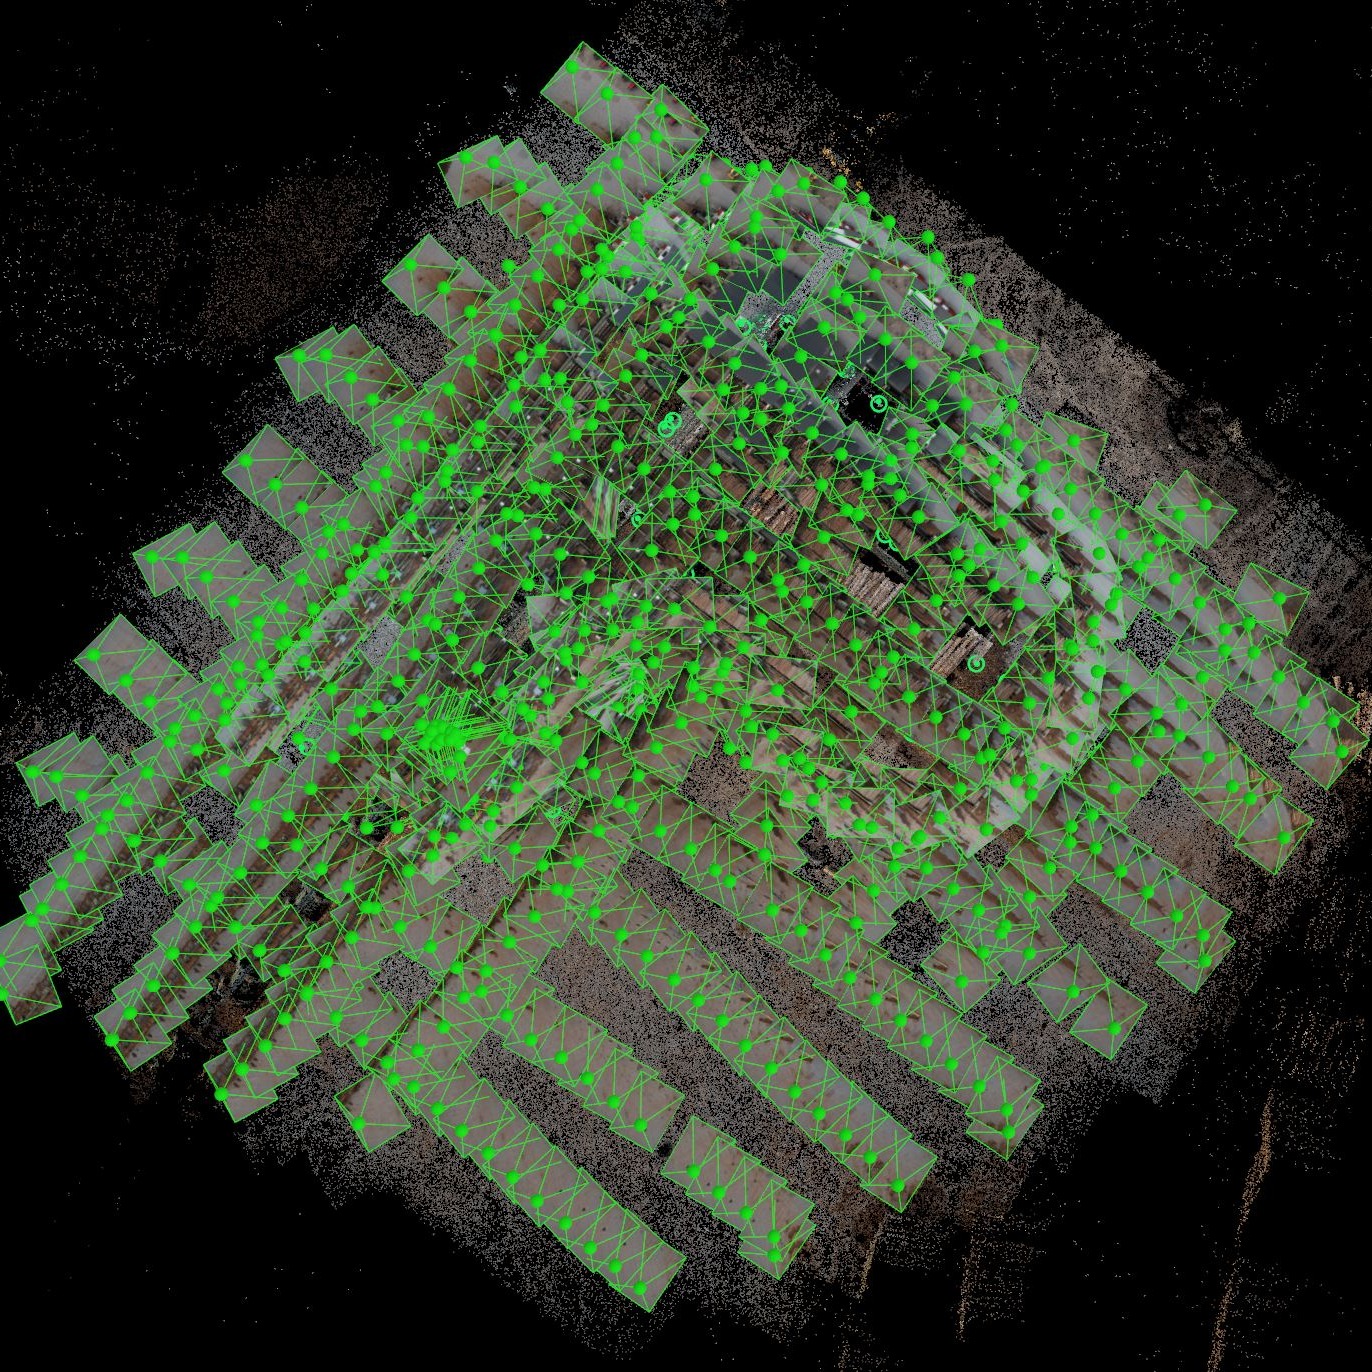
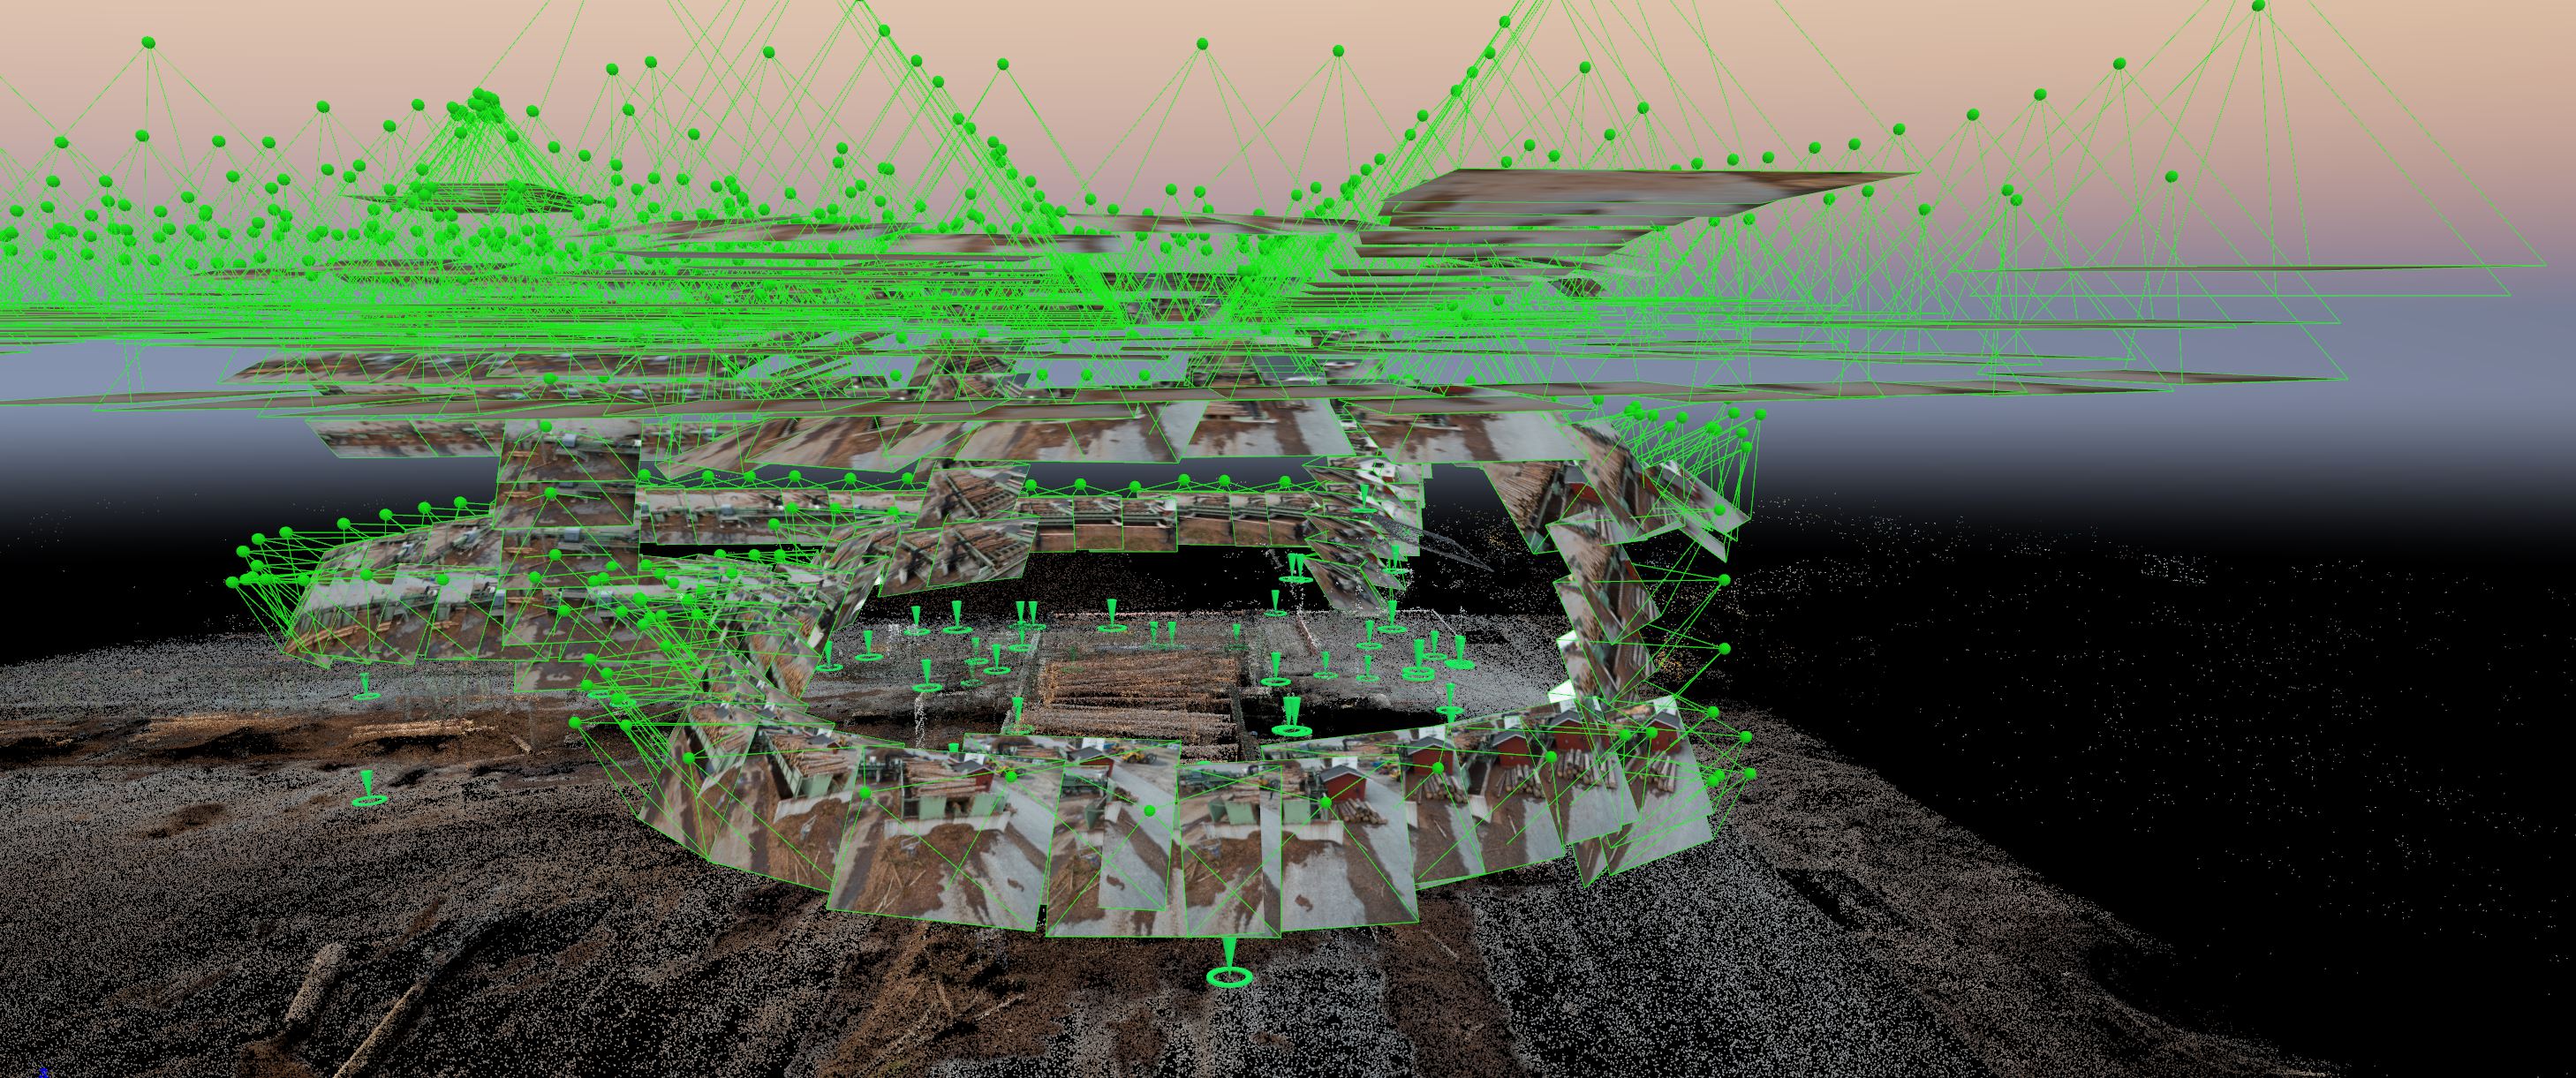
To capture images from the air, Laihola flew a single double-grid flight with his DJI Phantom 4 Professional. With both formats, Laihola shot in RAW format to capture as much information as possible.
“Taking extra photographs at the corners of the structure helps too,” added Laihola. “When you know how to take a picture, you know you’ve made it as a photogrammetrist!”
The large number of images - a total of 1,320 - ensured there was sufficient overlap for a detailed model. The next step was to combine them.
Combining aerial and terrestrial images
Laihola edited the RAW images in Adobe Lightroom to even out the difference in color between the two sets of pictures - one set of images was significantly ‘warmer’ looking than the other and differences in white balance almost guarantees a spotty-looking model. This step only took Laihola around an hour and a half as once one image is corrected, the photo editing software can apply the same changes to the whole batch.
The images were exported as JPG files, then imported into Pix4Dmapper. The aerial and terrestrial images were processed in parallel on two different desktop machines, both running Pix4Dmapper, then merged. Being able to see both datasets at the same time makes it easier to find the common tie points.
The point cloud was generated using the merged project.
While generating the point cloud was slower than it might have been with fewer images or lower processing options, the number of images helped create a better-looking model. Laihola explains: “With more images, you can select better options in Pix4Dmapper when working with the dense point cloud. You can change how many pictures a point has to be in - the higher the number, the less noise in the point cloud. When you increase the picture count, you don’t have to do so much manual work cleaning up the point cloud.” Laihola selected a minimum of five matches for this project.
Once the point cloud had been generated, the manual editing work began. Laihola estimates he spent around six hours cleaning up the model, especially the tight spaces between the girders. “The carving tool made the job a whole lot easier. If I had to do it again, I would take more pictures. My advice is to take a lot of pictures and let the machine do the work!” says Laihola.
Model and results
The final 3D point cloud was used by the Pölkky Oy team and contractors to plan the machine’s removal. “When you just send images, you don’t get the full picture,” says Laihola.
“When there’s a lot of people in a room, and you talk about something, it’s hard to know if we’re all discussing the same thing. But when you can point at a 3D model and say, 'here’s where an issue is, here’s the beam, here’s where we should run a cable,' you can visualize it and come to an agreement much more easily.”
Before the removal work began, mechanical and engineering teams from Pölkky Oy and an external contractor took measurements from the model - which has an average GSD of 0.5 cm. Many measurements were taken on-site with a measuring tape, and they were all found to be within one centimeter of measurements taken from the model.
The pre-planning, conducted with the help of Laihola's 3D model, helped insure the removal and subsequent installation of the new machine went smoothly, minimizing disruption to the running of the plant.

“For this project, I never considered using anything but Pix4D,” says Laihola. “Once you know how to take the pictures, it’s easy to use.”
From hobby drone pilot to professional photogrammetrist
While Laihola’s “day job” is Real Estate Manager at Pölkky Oy, he’s often flying a drone on weekends. “I always wanted to buy a drone!” Laihola laughs.
As well as creating models for fun, he works with a local private zoning planner.
Laihola explains: “The planner I work with didn’t know about this tech, although he had some previous encounters with orthomosaics. But he found a project, and laid the ground control points for me while I flew. Once he saw the finished project, he could clearly see the potential - he’s been calling me ever since.”
Laihola has quickly become highly skilled at photogrammetry and has received his Pix4Dmapper Fundamentals certification. Laihola’s employer, also uses mapping skills and equipment on a contractor basis.
“I’d like to call myself a photographer,” says Laihola, “But at this point, I’m really a photogrammetrist!”